21 results for “chromebook”
Unable to find what you are looking for? Click here to search again or maybe just contact us.
- View All Results (21)
- Degrees and Programs (0)
- News (0)
- Events (0)
- Faculty and Staff Directory (0)
- Support (20)
- Other (1)
What is a Chromebook?
Support
In a sense, your Chromebook is another breed of a laptop. The major difference between your Chromebook and other laptops is its Google Chrome operating system (OS). Your machine is designed to run the Google Chrome OS instead of Microsoft Windows or the Mac OS. Another difference which distinguishes your Chromebook from other laptops is that its applications and documents are stored in the cloud rather than a slow internal hard drive.
Accessing your applications and documents is easier and quicker. You can also access your apps and documents from multiple devices across various platforms. With virus protection built-in, multiple layers of security, and automatic updates, your Chromebook keeps your documents and applications safe from viruses, malware, and other possible security issues.
Learn more about your Chromebook here <https://www.google.com/chromebook/about/>.
How do I login to my Chromebook?
Support
When you power on your Chromebook for the first time, you will see a screen which asks you to sign in using a Gmail account. It is recommended that you sign in your Chromebook using your Bethel University Gmail account, you will be able to access and share your school documents.
You can also add other Gmail accounts to your Chromebook from the sign-on screen. Up to 17 additional Gmail accounts can be added to your Chromebook.
To add another person to your Chromebook follow the steps below:
If you are currently signed in to your Chromebook, sign out.
At the sign-in screen, click Add Person
Enter the Gmail username and password, click Next
Choose a picture for the new account, you can change your picture after signing in to your Chromebook.
If you do not have an additional Gmail account, you will need to create one. Some Chromebooks allow you to create a Gmail account by clicking on More Options and then Create a New Account.
When will I receive my laptop or Chromebook?
Support
Technology is shipped directly to students or given to students in person during New Student Orientation prior to the start of class.
If you did not receive your technology please contact your Adviser and they will assist you in receiving your technology.
How do I manage WIFI networks on my Chromebook?
Support
Many of us utilize multiple WIFI networks between home, school, work, and our favorite coffee shops. Your Chromebook automatically connects to internet connections in a specific order unless you designate it to connect to a specific one. This order is as follows:
Wired local area network (LAN)
Secure wireless network
Unsecured wireless network
Mobile data network
Set up your Chromebook to automatically connect to a network
This feature is helpful especially if you have used several networks and spend a majority of time near a specific network.
From the status area where your account picture is, click the status area.
Choose Settings.
In the Internet connection area, choose WIFI network.
Place a check in the box for Automatically connect to this network.
Click Close.
Manage ChromebookWIFI settings to prefer a network to connect to
This feature is useful to designate which network you prefer to connect to when surrounded by more than one.
From the status area where your account picture is, click the status area.
Choose Settings.
In the Internet connection area, choose WIFI network.
Place a check in the box for preferring this network.
Click Close.
Forgetting networks
Sometimes it is useful to clear your network list of networks that you no longer need access to or use. Forgetting networks helps eliminate networks in your list that are no longer want to see in the list.
From the status area where your account picture is, click the status area.
Choose Settings.
In the Internet connection area, choose WIFI network.
Click Preferred networks.
Use the touch-pad or mouse to point at the network you wish to forget and click the X.
Click Close.
Can I change the settings for my Chromebooks touchpad?
Support
You can make changes to the way your Chromebooks touch-pad works and how the mouse pointer moves.
Change touch-pad settings
-After signing into your Chromebook.
-Click the status area where your account picture is.
-Choose settings.
-Under the Device area, use the slider to adjust the speed of your touch-pad or mouse pointer.
-Click Touch-pad settings to:
--swap the primary mouse buttons
--turn on or off the tap-and-click feature
--change the scrolling method
-Choose OK.
Resolve touch-pad issues
If you experience issues with your touch-pad not functioning, there are troubleshooting steps you can try to resolve this issue. It is recommended that you test the touch-pad after each step to see if it starts working.
-Examine the touch-pad for dirt, dust, or other obstructions.
-Press the Esc key multiple times.
-Drum or tap the touch-pad for at least 10 seconds.
-Try restarting your Chromebook.
-Perform a hard reset on your Chromebook.
-Lastly, login to your Chromebook to see if the issue still occurs. If logging in with a different account reveals that the touch-pad works, you will need to remove the account that causes touch-pad issues and then re-add the account.
Performing a Hard Rest on your Chromebook
You can reset your Chromebook to factory default settings by performing a hard reset.
-Unplug your Chromebook.
-Use a paperclip, press the small hole on the backside of your Chromebook as indicated in your user guide.
-Plugin the power adapter.
Where do I find the user manual for my Chromebook?
Support
You can locate the user manual for your Chromebook directly by clicking here.
How do I connect my Chromebook to a WIFI network?
Support
When your Chromebook powers up, you can check to see if it is connected to a WIFI network by clicking the status area where your account picture appears. If your Chromebook is connected to a WIFI network, you will see the WIFI on the icon. If you see the WIFI off icon, you will need to turn on your Chromebooks WIFI.
Turn on WIFI
Click on the WIFI off icon.
Click No Network.
Click Turn on WIFI or click the enable WIFI icon.
Connect to a secure network
You will need to select the network that you want to connect to, click the secure network icon.
Enter the network password and press Enter.
Connect to a WPA2 enterprise network
Where your account picture appears, click the status area.
Choose Settings.
Under Internet Connection, choose Add Connection.
Choose Add WIFI.
Choose Advanced.
Next, enter your WPA2 network credentials
In the Server CA certificate field, you need to choose Default if the server certificate is currently installed on your Chromebook. This can be checked by visiting:chrome://settings/certificates in your browser, then clicking Authorities. *The networks administrator may need to install the server certificate in if isn’t already installed.
Click Connect.
Additional Chromebook WIFI troubleshooting topics can be found here.
Your Chromebook can connect to open networks that don’t require a password and secure networks that use WEP, WPA-PSK, WPA-Enterprise, or WPA2-Enterprise settings with these standards: 802.11 a/b/g/n and 802.11ac for AC equipped Chromebooks.
I did not receive my laptop or Chromebook, what should I do?
Support
Technology is shipped directly to students or given to students in person during New Student Orientation, prior to the start of class.
If you did not receive your technology please contact your Adviser and they will assist you in receiving your technology.
How do I open, save, search, or delete files from my Chromebook?
Support
Your Chromebook allows you to use files such as images, media, documents, and PDF documents. These files can be can saved, opened, and deleted from your Chromebook, Google Drive, and even an external hard drive. A complete list of file types, storage drives, and peripherals that are compatible can be found here <https://support.google.com/chromebook/answer/183093>.
Searching for files
You can search for files by clicking the search key (magnifying glass key on the keyboard). The search results reflect matches from the folder that you are in.
Opening a file
Click the launcher at the bottom left corner (magnifying glass icon)
Select Files
Using the left menu, you can choose the files you'd like to view.
Deleting a file or a folder
Click the launcher at the bottom left corner (magnifying glass icon).
SelectFiles.
Click the file or a folder that you want to delete.
Click the trashcan icon.
Saving a file
You can save a page you are viewing as a file by using the keyboard shortcut, Ctrl + S and then choose the location where you would save it.
If you want to save a file to your Chromebooks hard drive, you will need to select the downloads folder.
If you want to access your file anytime online and from any device, you will need to select Google Drive.
**Please beware that files in your downloads folder will automatically be deleted if your Chromebooks memory is running low.
You may want to set up a default location where your files will automatically be saved. This can be done in just a few steps:
Where your account picture appears, click on the status area.
Choose Settings and then Show Advanced Settings.
From the Downloads section, you can select a default downloads location by clicking Change
How do I connect my Chromebook to an external monitor or TV?
Support
You can connect your Chromebook to a monitor or TV by using the Chromebook’s HMDI port. After you have connected your Chromebook to a monitor or TV, you can extend your desktop across multiple screens or mirror your Chromebook desktop onto a larger screen.
Image:
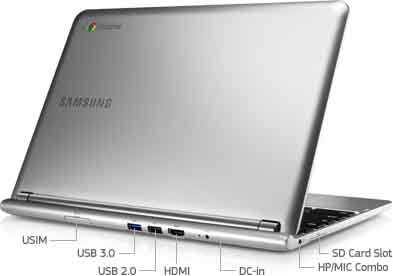
To connect a monitor or TV to your Chromebook, plug an HDMI cable from your monitor or TV into the HDMI port on your Chromebook.
If your monitor or TV does not have an HDMI port, it may have a Display Port, DVI, or VGA port. If this is the case, the instructions included with your Chromebook will tell you what type of adapter you need.
Adjusting, Rotating and Aligning Your Screen
You may need to adjust your screen settings, this can easily be done in just a few steps:
Click the status area, where your account picture appears.
Click the external display section and then click Manage displays.
Here you can identify displays or adjust their location.
Mirroring the display
Press Ctrl and <<< image: https://storage.googleapis.com... >>>
Rotating the image
Using the drop-down menu to rotate the image on your separate monitor.
Centering the screen
Click TV alignment.
You can move your viewing area by pressing the arrow and shift keys until you are satisfied with its alignment.
Using the display across multiple screens
Check the box for Enable Unified Desktop mode.
How can I move files from my Chromebook’s “downloads” to my Google Drive?
Support
Files can be moved from your Chromebook’s "downloads” and into your Google drive by clicking and dragging them to your Google Drive folder.
How do I access documents on my Chromebook from Google Drive while I’m offline?
Support
If you want to get to and access your documents on your Chromebook when you are offline or not connected to the internet, you will need to make them available offline. You can use Google Drive to edit and view saved documents while offline.
You will need to make sure Google Drive is turned on so that you can save documents for offline use.
Turn on Google Drive
Make sure you are online and log in to your Chromebook.
Open Chrome.
Navigate to your Google Drive by going to drive.google.com.
Click on the setting icon in the top right-hand corner.
From the offline area, check the box next to: Sync Google Docs, Sheets, Slides & Drawings files to this computer so that you can edit offline.
Select Done.
Your files will now begin to sync with your Chromebook and your Google Drive, depending on the amount and size of the files this process may take several minutes.
You can remove synced files from your Chromebook by turning off your Google Drive.
Turn off Google Drive
Make sure you are online and log in to your Chromebook.
Open Chrome.
Navigate to your Google Drive by going to drive.google.com.
Click on the setting icon in the top right-hand corner.
From the offline area, uncheck the box next to: Sync Google Docs, Sheets, Slides & Drawings files to this computer so that you can edit offline.
Select Done.
“Aw, Snap!” page crashes, how do I fix this?
Support
When you see an “Aw Snap!” message, Google Chrome is having issues and cannot load the page you are trying to access. There are however a few things that you can do that may be able to correct this problem.
Try reloading your page by clicking the reload or refresh button.
Close all of you open tabs, except for the tab that has the “Aw Snap!” message, and then try reloading your page again.
If the page will still not load, restart your device, and try loading the page again.
After you have tried all of these troubleshooting steps and still receive the “Aw Snap!” message, you can send feedback to Google but clicking on the message at the bottom of the page that says Send Feedback.
What is the Google Chrome operating system?
Support
The Google Chrome OS is an operating system which makes use of cloud storage for your applications and documents. The Google OS automatically updates on its own so you don’t have to be hassled by update installations or backing up your important documents. Because the Google Chrome OS has multiple layers of security and keeps itself up to date, your documents are safe from the threats of viruses, malware, and other harmful possibilities.
Find out more about Google Chromebooks here <https://www.google.com/chromebook/features/?>.
What are the different types of display ports on my laptop?
Support
HDMI
image:
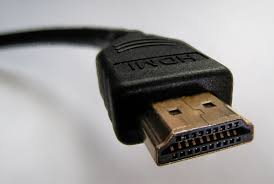
High-Definition Multimedia Interface (HDMI) is a unique technology which offers an interface for any audio or video source. and an audio or video monitor. HDMI supports standard, enhanced or high-definition video as well as multi-channel digital audio on a single cable. Plug in an HDMI cable to the corresponding HDMI port on our computer and the other end to your monitor or television’s HDMI port
VGA
image:
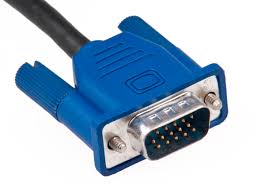
The Video Graphics Array (VGA) is the analog standard for connecting monitors to computers. Generally, these cables ends are colored blue. To setup, your VGA connection, simply plug up your monitor or television with a VGA in the corresponding VGA port and plug the other end of the cable to your computer.
Maintenance and Support
Support
If you're looking for maintenance assistance or technological support regarding Help Desk, Gmail, and various Google-based apps, you'll find it here.
What is browsing in private with incognito mode mean and how do I do this?
Support
You can surf the web and Google Chrome will not save a record of the pages that you have visited when you browse in incognito mode. To do this, you need to open an incognito window on your laptop or Chromebook, once the window is open you can browse without a record of your activity. Anything that you download however will be saved to your downloads folder.
Open an incognito window (keyboard shortcut Ctrl+Shift+N)
- Open your Chrome browser
- Tap the menu in the top left of your browser (box with three lines)
- Choose a new incognito window
How do I manage my bookmarks?
Support
You are able to edit, delete, and organize your bookmarked webpages. You are also able to update your bookmarks across other devices, learn how to manage your bookmarks by visiting the Manage Bookmarks <https://support.google.com/chromebook/answer/188842?hl=en&ref_topic=2586005> page.
What is Google Cloud Print and how do I use it?
Support
Google Cloud Print is a revolutionary technology that allows you to connect your printer to the web and print from anywhere literally. By using this technology, you can print from applications used daily which have the Google Cloud Print logo and from multiple devices that are connected to the web. You can even share your printers with others! Print what you want, wherever you are with Google Cloud Print. When you have a printer associated with your Google account, you can print from your Chromebook when signed in with the same Google account.
Connecting your printer Google Cloud Ready printer
Some printers come Google Cloud Print ready if your is- check the manufacturer’s instructions for connecting to Google Cloud Print.
Connecting your classicprinterGoogle Cloud printer
Make sure the printer is on.
Log in to your computer and open Google Chrome.
Click the Chrome menu in the top right corner of the browser menu bar.
Choose Settings.
Choose Show Advanced Settings.
Scroll down to the Google Cloud Print area and click Add printers.
Sign in to your Google account if prompted.
You may be asked to enter an application-specific password rather than your Google account password if you enabled 2-step verification (two-factor authentication).
Choose the printer or printers you want to connect and then choose Add printer.
Learn more about how Google Cloud Print works here <http://www.google.com/cloudprint/learn/howitworks.html>.
Printing with Google Cloud Print
You can print files from your computer and with Google Chrome. Additionally, you can print from applications that you’ve installed on various devices such as your smartphone, Chromebook, laptop, IPad, and other devices. A list of applications that work with Google Cloud Print can be found <here> <https://www.google.com/cloudprint/learn/apps.html>.
Printing files from your computer
Go to your Google Cloud Management Page <https://www.google.com/cloudprint#printers>.
Choose Print in the top left corner.
Select Upload file to print and then choose to select a file a from my computer.
Browse for a file to and then select Open.
Choose the printer you'd like and then click Print.
Printing with Google Chrome
Click the menu in the top right corner.
Choose Print.
Click Change in the Destination area.
Choose the printer you'd like and then click Print.
How do I edit files using Office Compatibility Mode (OCM)?
Support
You can open and edit your files using Office Compatibility Mode (OCM). This feature enables the ability to open and edit Microsoft Office files in your Google Drive, the Docs, Sheets, and Slides homes screens & apps, and Gmail. To do this, follow the steps below.
Open your Chrome browser using your laptop or Chromebook
Download the Office Editing for Docs, Sheets, & Slides Chrome<https://chrome.google.com/webstore/detail/office-editing-for-docs-s/gbkeegbaiigmenfmjfclcdgdpimamgkj> extension
Open an Office file and start editing
Check to see if you are using Office Compatibility Mode
Open an office file
Click File at the top left side
If you see “Office Compatibility Mode” at the top of your menu, you are able to edit the file or save it as a Google Docs, Sheets, or Slides file.
How do I convert documents into Google document formats?
Support
Using your laptop or Chromebook, go to your Google Drive settings. Click the checkbox that says, “Convert Uploads”.
This feature enables you to upload files like Microsoft Word and convert them upon opening them.
Supported files
Here is a list of the types of files supported by Docs, Slides, and Sheets.
Documents: .doc, .docx, .docm, .dot, .dotx, .dotm, .html, plain text (.txt), .rtf, and .odt
Spreadsheets: .xls, .xlsx, .xlsm, .xlt, .xlt, .xltx, .xltm, .ods, .cvs, .tsv, .txt, .tab
Presentations: .ppt, .pptx, .pptm, .pps, .ppsx, ,ppsm, .pot, .potx, potm, .odp
Drawings: .wmf, .emf
Optical Carrier Recognition (OCR): .jpg, .gif, .png, .pdf
Files not supported
Some files are not supported during the conversion to Docs, Sheets, Slides, these files include:
-Files which are password protected
-Files that include macros
-Files that have embedded charts within Microsoft Word and PowerPoint
-Files that include linked spreadsheets in Microsoft Excel
You can save and export files to an Office format
Upon converting your files to Google Docs, Sheets, or Slides, you can save and export them back into an Office format.
-Open the file
-Click file menu
-Select Download as
-Choose the format you want to convert the file to